Creating a SAML Identity Provider using Shibboleth 3
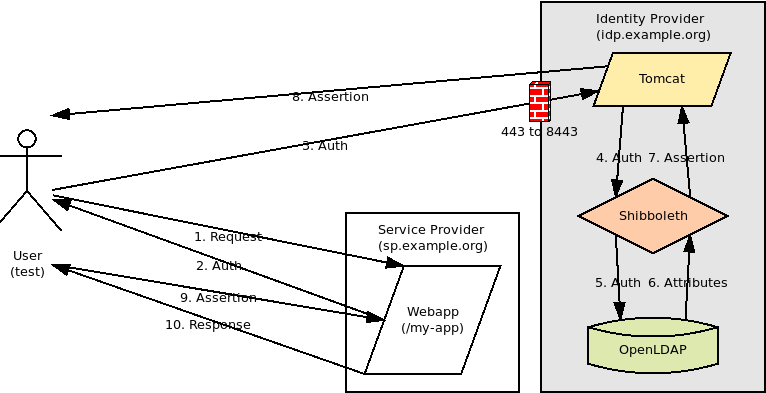 |
| Identity Provider in the SAML authentication process |
The following settings will be used in this demo:
- SP entity ID: https://sp.example.org
- SP callback URL: https://sp.example.org/my-app/saml
- IDP entity ID: https://idp.example.org/idp/shibboleth
Generating SP Metadata
The Identity Provider requires some information about each Service Provider it is handling Authentication Requests for including its Entity ID, its signing and encryption policy, the keys used for signing/encryption (if applicable), and the callback URL where the IDP should post Assertions. In Shibboleth, this information is provided to the IDP via SP metadata. If your SP implementation does not already generate its own metadata, one way to generate valid SP metadata is to programmatically build it using the classes in the OpenSAML 3 Java library and then marshall it to XML as shown in the following program. |
| SP metadata generator program |
Lines 56-59 specify the signing and encryption policy and keys. The keys used in the program can be generated using this Java keytool command:
keytool -genkeypair -alias sp.example.org -keyalg RSA -dname "CN=sp.example.org" -keypass changeit -validity 365 -keystore sp.example.org.jks -storepass changeit
The SP metadata generator program outputs a file named sp-metadata.xml with the following contents. This file will be used during the configuration of Shibboleth.
 |
| SP metadata file generated by the SP metadata generator program |
Creating the LDAP directory server
In the default configuration, the Shibboleth IDP is configured to perform Password based authentication against a LDAP directory. It will also use this LDAP directory to resolve user attributes when creating Assertions. For this demo, I will use following LDAP directory tree. |
| LDAP directory tree |
Install the OpenLDAP server
sudo apt install slapd ldap-utilsCreate the LDAP directory
sudo dpkg-reconfigure slapd |
| Configuring the base DN for the LDAP directory |
Create a file named entries.ldif containing the entries to add
dn: ou=people,dc=example,dc=orgobjectClass: organizationalUnit
objectClass: top
ou: people
dn: cn=test,ou=people,dc=example,dc=org
objectClass: inetOrgPerson
objectClass: organizationalPerson
objectClass: person
objectClass: top
cn: test
mail: test@example.org
sn: test
userPassword: changeit
Add the entries
ldapadd -x -D cn=admin,dc=example,dc=org -w changeit -f entries.ldifInstalling Shibboleth
The Shibboleth IDP is implemented as a Java web application and requires a Java Servlet container to run on. For this demo, I will use Tomcat 8.Install Java JDK
tar zxf jdk-8u172-linux-x64.tar.gzSet JAVA_HOME and update PATH environment variables
export JAVA_HOME=/path/to/jdk1.8.0_172export PATH=$JAVA_HOME/bin:$PATH
Generate a key pair for Tomcat SSL
keytool -genkeypair -alias idp.example.org -keyalg RSA -dname "CN=idp.example.org" -keypass changeit -validity 365 -keystore idp.example.org.jks -storepass changeitInstall Tomcat
tar zxf apache-tomcat-8.5.31.tar.gzSet CATALINA_HOME and update PATH environment variables
export CATALINA_HOME=/path/to/apache-tomcat-8.5.31export PATH=$JAVA_HOME/bin:$CATALINA_HOME/bin:$PATH
Enable SSL in $CATALINA_HOME/conf/server.xml
<Connector port="8443" protocol="org.apache.coyote.http11.Http11NioProtocol"scheme="https" secure="true"
keystoreFile="/path/to/idp.example.org.jks" keystorePass="changeit"
clientAuth="false" sslProtocol="TLS"
maxThreads="150" SSLEnabled="true"/>
Configure port forwarding for HTTP/HTTPS
 |
| Configuring port forwarding from 80/443 to 8080/8443 |
Install Shibboleth IDP
tar zxf shibboleth-identity-provider-3.3.3.tar.gzcd shibboleth-identity-provider-3.3.3/
bash ./bin/install.sh
Source (Distribution) Directory (press <enter> to accept default): [/path/to/shibboleth-identity-provider-3.3.3]
Installation Directory: [/opt/shibboleth-idp]
/path/to/shibboleth-idp
Hostname: [localhost.localdomain]
idp.example.org
SAML EntityID: [https://idp.example.org/idp/shibboleth]
Attribute Scope: [localdomain]
example.org
Add JSTL jar to IDP webapp and rebuild
cd /path/to/shibboleth-idp/edit-webapp/WEB-INF/libwget https://build.shibboleth.net/nexus/service/local/repositories/thirdparty/content/javax/servlet/jstl/1.2/jstl-1.2.jar
cd /path/to/shibboleth-idp
bash ./bin/build.sh
Create context descriptor for IDP webapp at $CATALINA_HOME/conf/Catalina/localhost/idp.xml
<Context docBase="/path/to/shibboleth-idp/war/idp.war"privileged="true"
antiResourceLocking="false"
swallowOutput="true">
<CookieProcessor alwaysAddExpires="true" />
</Context>
Set CATALINA_OPTS environment variable
export CATALINA_OPTS="-Didp.home=/path/to/shibboleth-idp -XX:+UseG1GC -Xmx1500m -XX:MaxPermSize=128m"Configuring Shibboleth
Configure SP metadata
Copy SP metadata file to IDP's metadata directory
cp sp-metadata.xml /path/to/shibboleth-idp/metadata/Add MetadataProvider for SP metadata file to /path/to/shibboleth-idp/conf/metadata-providers.xml
<MetadataProvider id="LocalMetadata" xsi:type="FilesystemMetadataProvider" metadataFile="%{idp.home}/metadata/sp-metadata.xml"/>Configure LDAP
Set LDAP properties in /path/to/shibboleth-idp/conf/ldap.properties
idp.authn.LDAP.ldapURL = ldap://localhost:389idp.authn.LDAP.useStartTLS = false
idp.authn.LDAP.baseDN = ou=people,dc=example,dc=org
idp.authn.LDAP.userFilter = (cn={user})
idp.authn.LDAP.bindDN = cn=admin,dc=example,dc=org
idp.authn.LDAP.bindDNCredential = changeit
idp.attribute.resolver.LDAP.searchFilter = (cn=$resolutionContext.principal)
Configure attributes
Shibboleth determines which attributes to add to Assertions based on the configuration of the attribute resolver and attribute filter. The former defines the set of all attributes. The latter defines rules that control which subset of these attributes to add to Assertions. For this demo, I will add the cn and mail attributes to Assertions.Configure attribute resolver in /path/to/shibboleth-idp/conf/attribute-resolver.xml
The attribute resolver contains one or more attribute definitions which encodes a subject's attribute as a SAML attribute. A LDAP data connector can be used to reference attributes from the subject's LDAP entry. |
| Defining the cn and mail attributes and a LDAP data connector in attribute-resolver.xml |
On line 7, the attribute definition for the cn attribute encodes the subject's principal name (login) as a SAML 2 attribute named urn:oid:2.5.4.3. The mapping from principal name to cn is valid because the LDAP filter matches users on the cn attribute (cn={user}). The urn:oid:{LDAP attribute OID} pattern for naming SAML attributes appears to be the convention used in Shibboleth, but any unique value can be used instead. On line 12, the LDAP data connector is referenced in the attribute definition for the mail attribute because the attribute comes from the subject's LDAP entry. The LDAP data connector defined on line 16 is configured using properties from ldap.properties.
Configure attribute filter in /path/to/shibboleth-idp/conf/attribute-filter.xml
The attribute filter contains one or more attribute filter policies that control when an attribute should be added Assertions. |
| Defining the attribute filter policy in attribute-filter.xml |
The attribute filter policy on line 7 adds the cn and mail attributes to Assertions if the Requester (SP) has an entity ID of https://sp.example.org.
Configure IDP encryption policy in /path/to/shibboleth-idp/conf/idp.properties (if necessary)
In the default configuration, Authentication Requests from SPs that do not have a KeyDescriptor for encryption in their configured metadata will fail. If your IDP needs to support these SPs, you can make encryption optional using the following property.idp.encryption.optional = true
Shibboleth IDP in action
Get IDP metadata
 |
| The IDP metadata is located at https://idp.example.org/idp/shibboleth |
Note: If your SP implementation uses a HTTP based metadata resolver, you may need to add the idp.example.org cert to your SP's truststore. For a SP running on Tomcat, this can be accomplished with the following commands:
keytool -importcert -alias idp.example.org -file idpexampleorg.crt -noprompt -keystore truststore.jks -storepass changeit
export CATALINA_OPTS="-Djavax.net.ssl.trustStore=/path/to/truststore.jks"
Login to IDP
 |
| The user is redirected to the IDP login screen for authentication from the SP |
Release attributes to SP
 |
| The IDP prompts the user for consent to share attributes with the SP |
Service Provider
 |
| The SP uses the mail attribute from the Assertion in a personalized greeting |
Merkur Review 2021 | How to make money from Merkur
ReplyDeleteRead our in-depth Merkur Review 2021 on how to make money from Merkur. Find dafabet out how to make money 메리트카지노 from Merkur, including ratings, deposits, and ラッキーニッキー promotions.
They use random quantity mills to ensure fair play and use SSL encryption to guard your personal and monetary info. This on-line gambling platform did a fine job establishing itself as a prominent slots provider. It hosts 6 of the biggest recreation studios and delivers a few of the the} greatest welcome bonuses within the trade. If your concept of on-line gambling involves virtual sports activities 원 엑스 벳 betting and poker, find a way to|you possibly can}'t go wrong with Ignition.
ReplyDelete